Tutorials
How to create random walls and floors with Crossmap & BerconTile
Mar
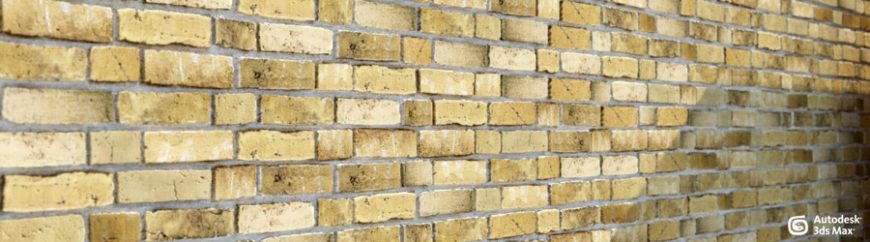
This tutorial explains how to create randomly tiled wall or floor materials with Crossmap and BerconTile. Using this method has the advantage of getting rid of the tiling / repetition seen in many renderings with standard bitmaps. Also, you can save RAM by using smaller bitmaps for larger walls by still keeping a very high resolution even in close ups.
Easier alternative -> Walls & Tiles
While Crossmap together with BerconTile is a good solution, Walls & Tiles automates this process with a very easy to use additional scripted Plugin. All the process below is mostly automated with Walls & Tiles. Check it out here…
Crossmap works great in combination with the free plugin BerconTile. Crossmap is used to randomize bitmaps of single bricks / tiles and BerconTile is used to create mapping information for the bond pattern. You can easily change bitmaps and keep the pattern or change the pattern and keep the bitmaps.
Crossmap is a texture-map plugin from VIZPARK which loads multiple bitmaps at once and distributes these images on objects, elements, faces, or via BerconTile for bond patterns. While Crossmap is great at distributing bitmaps on square-tiled faces of a plane for example, it cannot create bond patterns used in brick walls. This is where BerconTile comes into place. BerconTile is a great FREE plugin from Jerry Ylilammy which is fantastic for creating bond patterns procedurally. It though is limited to load one bitmap at a time. If you want to distribute multiple bitmaps for random distribution, you can use Crossmap within BerconTile and let Crossmap do the bitmap randomization and BerconTile the UV mapping for bond patterns. Crossmap is specifically compatible with BerconTile in a way that both maps can communicate with each other for randomization of bitmaps and colors.
So, here is how it works.
(1) Material setup with Crossmap and BerconTile
First make sure that you have installed both Crossmap and BerconTile (FREE) for your 3Ds Max version. You can download BerconMaps FREE here.
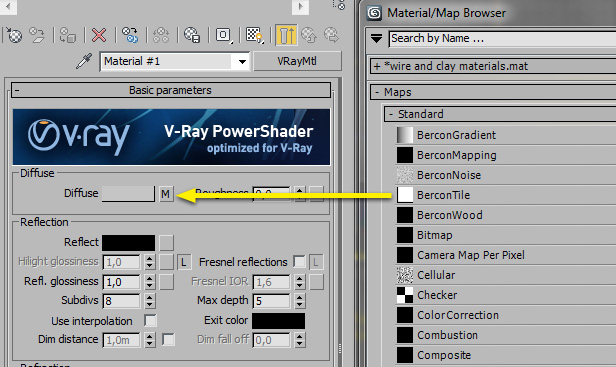
Then insert the BerconTile map in the diffuse channel of your material (vray or standard material).
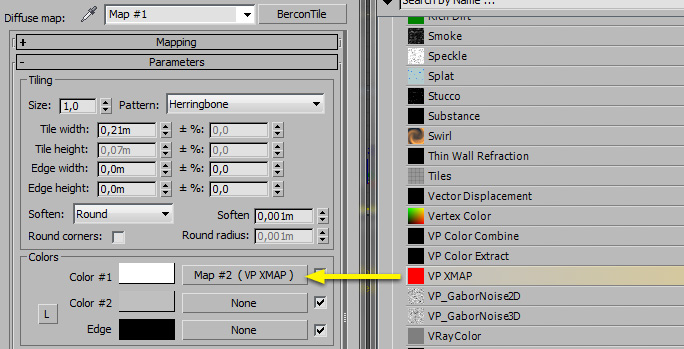
Next, within the BerconTile map, insert CROSSMAP (XMAP) in the first Color slot Color #1.
(2) CROSSMAP settings
Now, load multiple bitmaps into Crossmap, either by selecting a whole folder with bitmaps or by adding bitmaps individually, when they are stored in different locations.
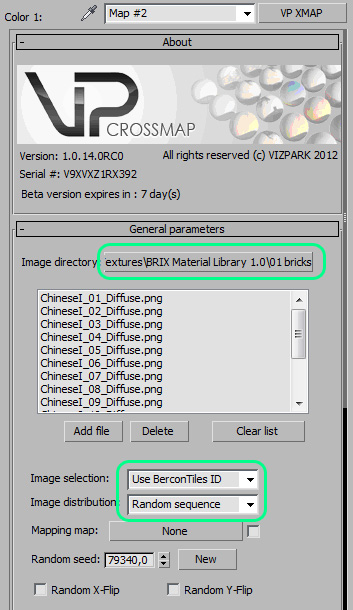
Load bitmaps and set Crossmap to BerconTiles ID
Then set Image selection to Use BerconTiles ID. This will create the connection between BerconTile and Crossmap, so that images are mapped correctly in the UV pattern of BerconTile and Crossmap knows how to randomize bitmaps and colors. Also set Image distribution to Random sequence, unless you specifically want repetitive patterns (in which case you need to set it to Linear sequence).
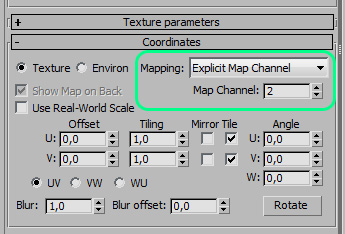
Crossmap Mapping settings
It´s quite important that the mapping settings in Crossmap are correct in order to get mapping coordinates from BerconTile. Set Mapping to Explicit Map Channel and the Map Channel to 2. The map channel 2 is the channel for the individual map coordinates for each tile / brick from BerconTile, while the map channel 1 is used for the overall map on the objects.
(3) BERCONTILE settings
Next we need to set BerconTile to create tiled uv maps, select the bond pattern and “talk” to Crossmap.
BerconTile Mapping rollout
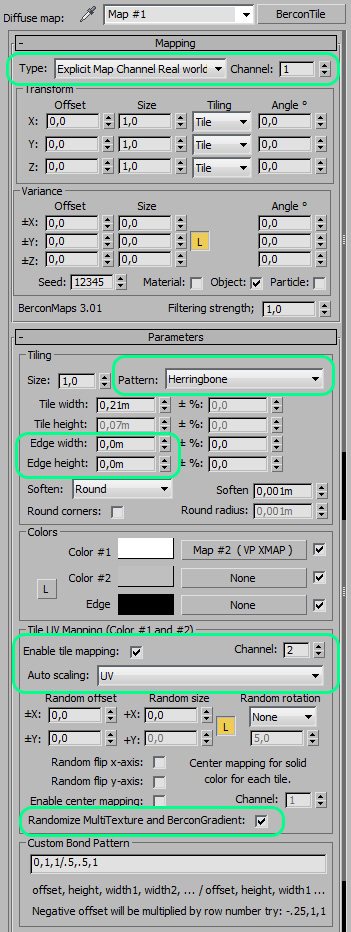
First you need to set the mapping type in the mapping rollout to Explicit Map Channel Real World. If you have set your system units correctly, you can later set the size of the bricks directly to the correct real world size of bricks used in your country, for example width: 24 cm / height: 7,1 cm. I´ll explain later more about brick sizes and their usage.
Bond patterns
With the Pattern: dropdown menu you can select the bond pattern that you want to use for your wall or floor. BerconTile offers a variety of standard bond patterns and even goes beyond: You can create your own bond patterns directly within BerconTile. Below is a list of available bond pattern presets.
Using VIZPARK textures, you don´t need to add procedural edges to your bricks / tiles, so you have to set the Edge width and height to 0,0. If these are not 0,0, you will see a colored mortar / edge between the bricks.
Set tile UV mapping
In order to let Crossmap use correct uv maps for each brick, you need to turn on Enable Tile Mapping and set the Map Channel to 2.
Connect to Crossmap
Turn on Randomize Multitexture and BerconGradient and Crossmap will get “under the hood” information from BerconTile to randomize bitmaps and colors.
(4) Object UV map modifier
In order to get correct mapping on objects, you need to use the UV map modifier applied on every object.

UV map modifier settings
There is basically just one setting: Use Real-World Map Size. This will make sure that your mapping will work throughout the whole material and independent of your object size. Once again, it´s important that your unit setup in the 3Ds max preferences is set correctly.
Of course you can use different map gizmos according to your object. Use box on most of the standard buildings with 90° corners, cylinder on round objects or planar on flat surfaces.
(5) Bond patterns
Here is a list of available bond pattern presets within BerconTile. Once you have set up your material, you can quite easily change the pattern by just selecting a different preset from the drop down menu.

You can get many more individual patterns if you use the custom pattern preset and type in your own presets within BerconTile. It´s a very powerful feature which I´ll explain some time later.
(6) Adding Bump, Reflection, displacement
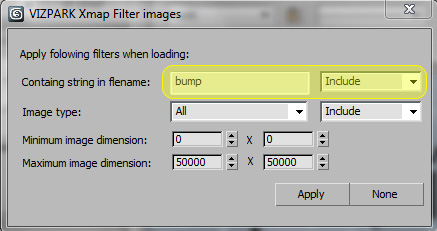
If you have set up your material properly, you will now get some nice results when rendering. But you probably want to add more realism with bump, displacement, andreflection to your material. This is where Crossmap has some strong features, because you can load bitmaps from a folder and filter specific bitmaps by name. So if your folder contains different bitmaps with endings like _diffuse, _bump, _reflection etc., you can just load the bump bitmaps or displacement bitmap in Crossmap.
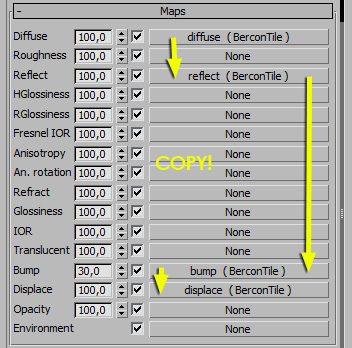
Duplicate BerconTile including Crossmap
In order to create the other channels with bump, displacement, reflection or others, just make a copy (not instance!) of the BerconTile map containing Crossmap. Creating a copy and not an instance is important, because each Crossmap instance needs different bitmaps that will be used for the specific channels.
Load new bitmaps for bump, displacement etc.
After you copied the maps, go into each Crossmap within BerconTile and load new bitmaps for bump, reflection and displacement. You can easily filter bitmaps on load with the handy load-filter in Crossmap.
So, this is it. If nothing went wrong, you should get wonderful randomly tiled materials, with no repetition even in very large walls / floors and yet a very high resolution texture on close-ups.
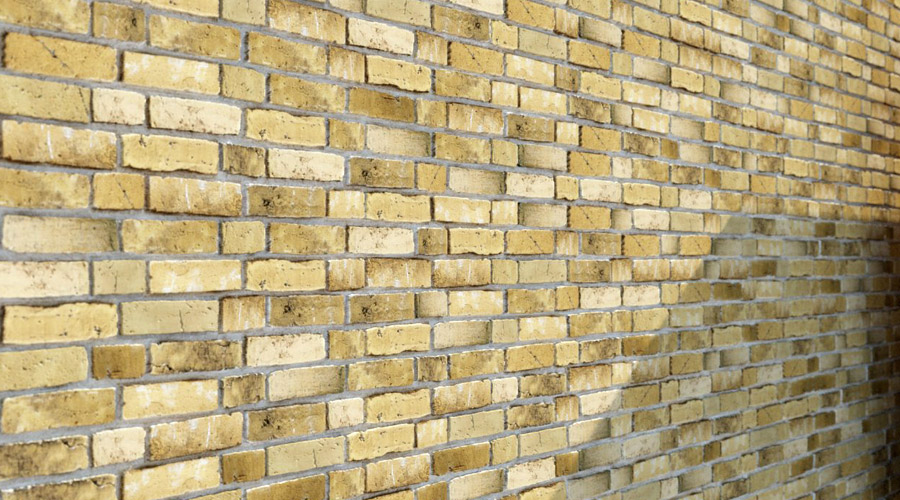
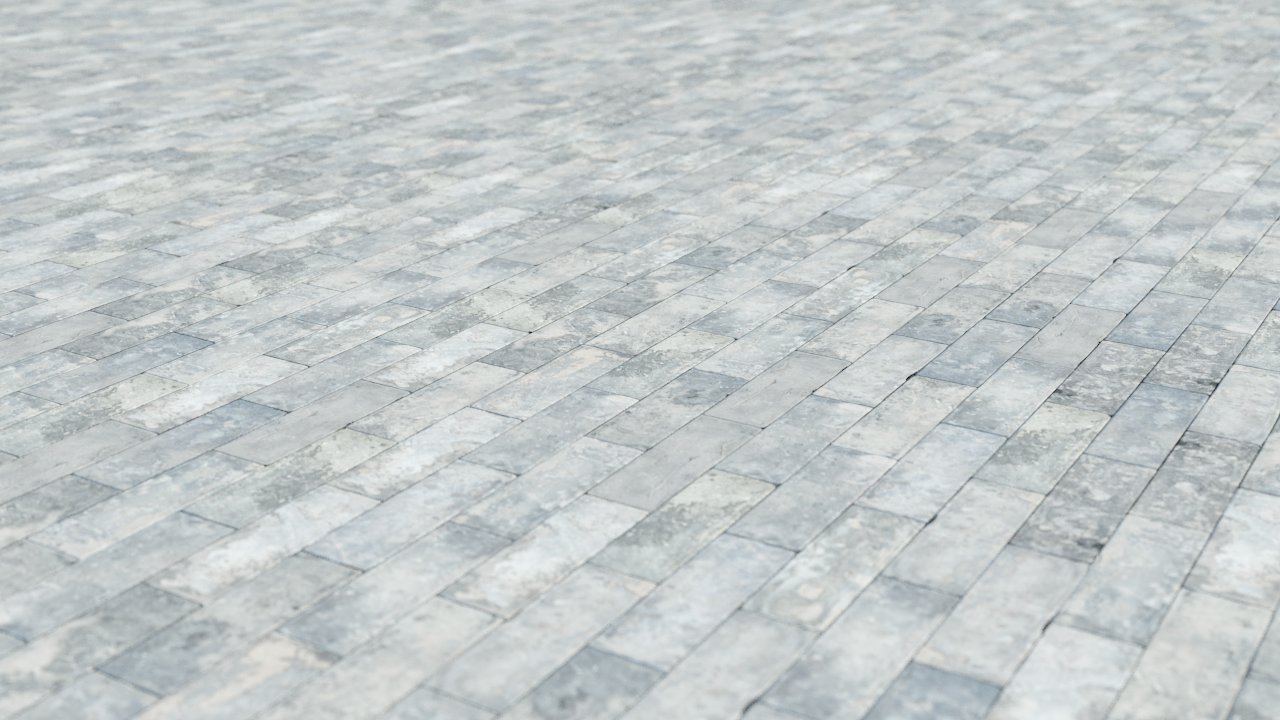
Here are a few examples:

nice tut, thank you!
Thank you! Let me know if there is anything missing. I´m planning to add some more info on creating custom tiles with BerconTile.
Best, Martin
Hi Martin,
Nice tut, I must have test the new version this weekend.
I was wondering can you use bercon maps to do rock walls too ?
odd shaped rocks ?
Do you mean irregular rock walls? Well, I think BerconTile is primarily made for regular patterns. But is has some very nice map randomization features, which will be useful for other maps as well. I don´t think it can create rock walls with natural different shaped stones. I´d rather use http://www.filterforge.com/ with some filter to create procedural walls of this kind or buy textures from arroway. I don´t know of any solution for these kind of textures yet.
Muito valioso este site. Por enquanto não tenho perguntas e também respostas, pois sou novato no seguimento de visualização arquitetônica. Espero sim um dia estar também podendo contribuir com todos aqueles que necessitam, como vocês o fazem, e o fazem bem!
Parabéns!
Obrigado 🙂
I just got my plug-in, and I look forward to learning it.
Baixei a versão trial, mas não consegui fazer uma parede com ele.
Hi Rodrigo, please try Walls & Tiles, which is much easier to use for walls than Crossmap alone. You can find the demo here: https://www.vizpark.com/shop/walls-and-tiles/