What is OMNITILES ?
OMNITILES STANDALONE is a texture generator that creates any types of patterns based on editable shapes and bitmaps. If you´re looking for flexible and custom textures of walls, floors or interior tiles, OMNITILES offers complete freedom in the way patterns can be created and edited.
3Ds Max version - reference guide - Go HereWhat is the difference between OMNITILES Standalone and OMNITILES 3Ds Max ?
There are many differences between these two versions, but the main difference is that the Standalone runs on Windows 7 or 10 directly, while the 3Ds Max version requires Autodesk 3Ds Max and only works as a plugin. So, depending on your 3D application(s), each version has its advantages or disadvantages compared to each other.
OMNITILES STANDALONE – User Interface and general parameters
Omnitiles consists of two main parts, the Omnitiles – APPLICATION and the Omnitiles – LIBRARY which includes pattern files, multi-textures and material presets that can be loaded with Omnitiles. If you are having problems using Omnitiles and the documentation won´t help, please submit a support ticket.
Quickstart
QUICKSTART – 6 min.
Learn how to create patterns, load textures, load patterns, and render out textures. This tutorial gives you a short overview or all parts in the Omnitiles user interface and how to use them.
Omnitiles Standalone - Main Interface

The main window opens the pattern editor with four areas:
HEADER (TOP)
The header bar has all main options with the File menu to load / save presets, open the Texture Manager, load Pattern presets, open the Preview window, Render Settings, Preferences and the Help menu.
PATTERN EDITOR AREA (MIDDLE)
The main area in the middle is the pattern editor, where you can create and edit shapes and patterns.
EDIT BUTTONS (LEFT)
On the left side you can find buttons to create, edit, and modify shapes in the editor, adjust the grid or load a background source image.
SHAPE AND GROUP LIST (RIGHT)
The list on the right side shows all shapes and groups where you can assign shapes to groups.
HEADER - LOAD / SAVE PRESETS & HANDLE TEXTUREs AND PATTERNS
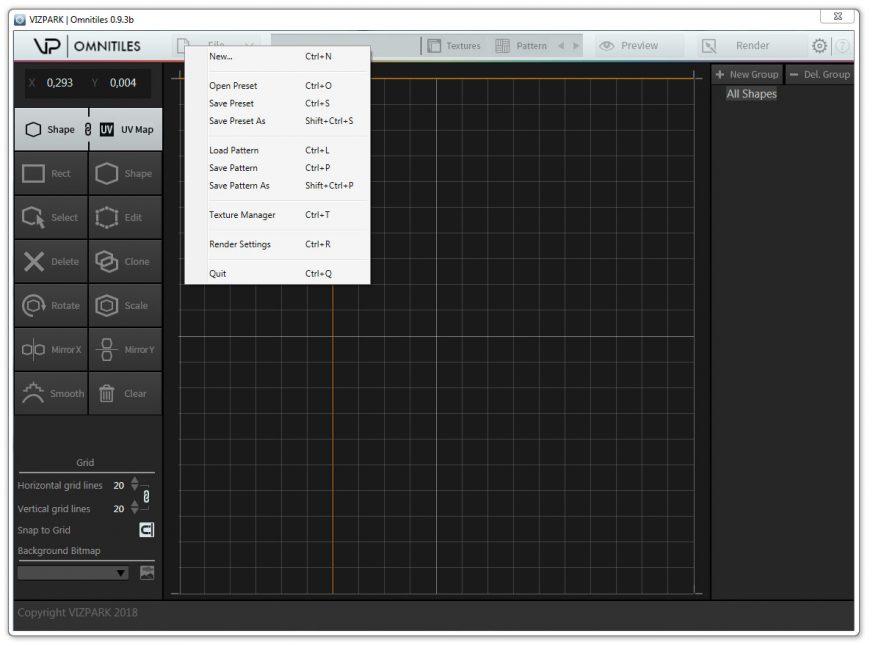
FILE MENU
The main File menu handles all global / full presets, pattern presets and opens the texture manager and render settings. All options have a keyboard shortcut, shown aside.
New… – Resets the all parameters of Omnitiles and clears all bitmaps.
Open Preset – Opens a FULL preset that includes the pattern, bitmaps (references) and further settings.
Save Preset – Saves a FULL preset that includes the pattern, bitmaps (references) and further settings. When saving a full preset, you can choose to copy bitmaps to your new preset file location or leave the bitmaps where they are (relative).
Save Preset As – Saves a FULL NEW preset that includes the pattern, bitmaps (references) and further settings. When saving a full preset, you can choose to copy bitmaps to your new preset file location or leave the bitmaps where they are (relative).
Load Pattern – Loads a pattern file (without changing the loaded bitmaps).
Save Pattern – Saves a pattern file.
Save Pattern As – Saves a NEW pattern file.
Texture Manager – Opens the Texture Manager where all bitmaps and assignments can be handled.
Render Settings – Opens the Render Dialog where all render related settings can be made and the output can be rendered.
TEXTURE MANAGER
Click on the TEXTURES label in the header opens the Texture Manager, which loads and handles all bitmaps and layers. You can easily load all bitmaps automatically from an entire folder, assign bitmaps to shapes and groups and change and add channels.
Scan Folder
This option opens a file dialog where you can select the folder to load all bitmaps that fit into the filter scheme of Omnitiles settings. Depending on the settings in the channel manager (see below) bitmaps are loaded in each layer / channel if the filename contains one of the filter strings in from the channel manager. This way, diffuse maps are loaded into the diffuse layer, bump maps into the bump layer and so on.
If bitmaps are already loaded, you can choose to either REPLACE the existing bitmaps, which will replace all loaded bitmaps with the newly loaded ones, or ADD bitmaps to the existing ones, if you want to mix bitmaps.
Add
You can add single bitmaps or a selection of bitmaps to the currently selected layer. This option does not use the automatic filter when loading bitmaps, which is on purpose, for example if you want to load displacement bitmaps as bump maps.
Remove
Remove will remove all bitmaps that are currently selected. You can shift-select a list or ctrl-select different bitmaps from the list. If you want to delete bitmaps from different channels / layers, you need to remove these from each layer individually. This is also by design, since it may make sense to keep bitmaps in one layer while removing from another.
Clear All
As the name suggests, this will remove all bitmaps from the texture manager.
Selection Mode
The selection mode defines in which order bitmaps are assigned to the shapes in a pattern. There are three modes:
- LINEAR SEQUENCE (one by one in a row)
- RANDOM
- RANDOM BUT UNIQUE FIRST (avoids repetitions)
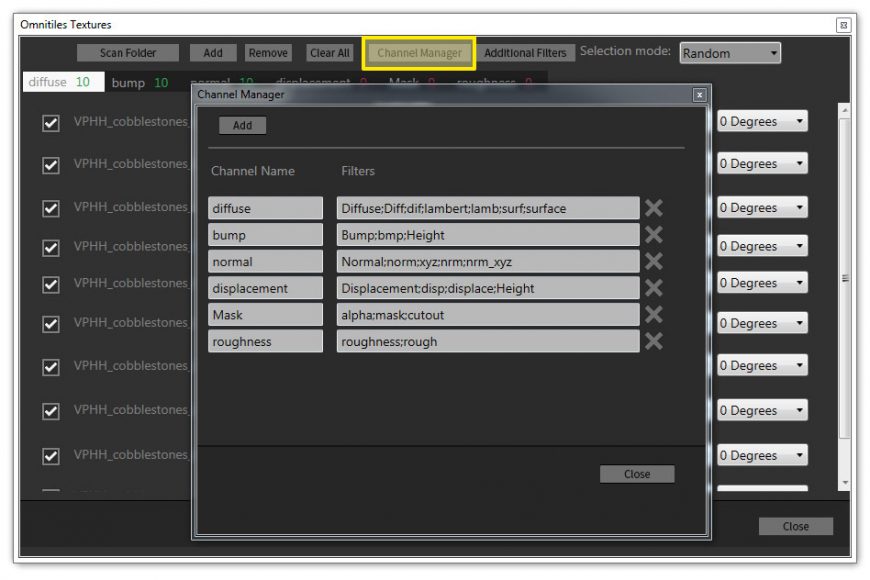
Channel Manager
This will open a dialog to adjust layers/channels for Omnitiles. You can add more layers, e.g. ambient occlusion or anything else you need and new tabs will be created in the Texture Manager window. If you want to load bitmaps automatically into these layers, you need to add strings to the filter field, which need to be contained in the filename of the bitmaps.
You can add multiple filters of which only one needs to fit a part of the filename to be filtered and loaded into this channel. Multiple filter strings can be added using semicolon “;” between the strings.
The channel tabs in the main texture manager show the number of loaded bitmaps in green if the number of bitmaps are in sync between the layers and in red if there is a mismatch (less or more bitmaps). This is not a problem for Omnitiles, just an indicator in case bitmaps should be in sync between the layers.

Group / Shape Assignment
This menu is quite powerful, since you can assign one or more bitmaps to specific shapes or groups. If you want to create a pattern with differently colored stones for example, you can choose to assign one set of bitmaps to one group and another to a second group. The bitmaps will then only be assigned to the group they were assigned to. As an example, you might want to take a look at the included demo preset Roman Mosaic Floor.vop, which helps to illustrate this option.
Texture / Bitmap List
The lists below each layer tab shows the currently loaded bitmaps. A small thumbnail, the size of the bitmap, a color field (currently without function … follows in an update soon), the importance parameter, group / shape assignment and the rotation option.
Color Field
The small color field will show the average color of a loaded bitmap, which will be used to match a bitmap to a color of a source map. This feature is used to create Mosaic images based on a pattern, bitmaps and a source image.
Importance
The importance parameter changes the way how often an image will be selected for a pattern and shape. If the value is higher, it will be chose more often, if it´s lower it will appear less often. This way, unwanted bitmaps can be reduced and others can be used more often.
Rotation
This menu allows rotation of a bitmap by +90° / – 90° or 180°. To adjust this for multiple bitmaps at once, just select the bitmaps with shift-selection or ctrl-selection from the list, then change the option from one of the menus.
All bitmaps randomly

All loaded bitmaps (black and white mosaic tiles) are assigned to all shapes without any special group or shape assignment.
2 groups of bitmaps

This example Checker uses2 groups where one group has all white bitmaps assigned, the other group all black bitmaps.
3 groups of bitmaps

This example uses three different groups, each with different bitmaps loaded for bright, dark and colored shapes.
3 groups of bitmaps

This example also uses three different groups, for bright large shapes, smaller brick shapes (red) and dark mid-sized shapes (black).
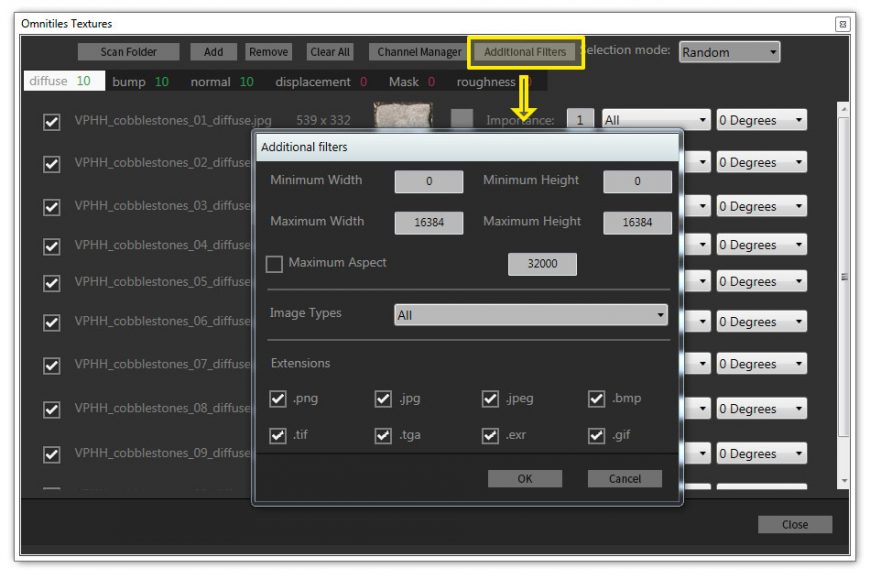
Additional Filters
This dialog provides even more options when loading bitmaps, aside the string filters in the channel manager. You can limit the size, aspect ratio, image type and image format here to further load just the images that you want.
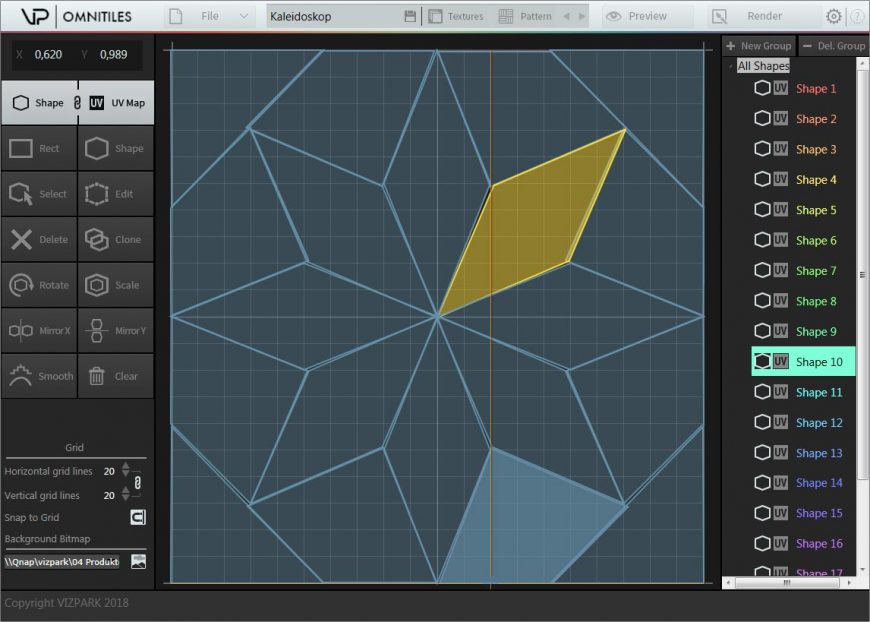
PATTERN EDITOR
Create and edit Patterns
The main window shows the pattern editor with the main editor area in the middle, the editor modes and settings on the left panel and the groups and shapes list on the right panel.
Grid and Background
Using the grid helps to get symmetrical patterns or straight shapes more easily. Can you choose the grid size and turn the grid on / off.
SNAP TO GRID – Turns the grid on / off
GRID LINES – Adjust the grid size / resolution. Turn the binding symbol off to adjust vertical and horizontally independent from each other.
BACKGROUND IMAGE – This will load and show a source image in the background to serve as a guide for pattern creation.
Left Panel – Edit Modes
This dialog provides even more options when loading bitmaps, aside the string filters in the channel manager. You can limit the size, aspect ratio, image type and image format here to further load just the images that you want.
- RECT – Creates a new rectangular shape
- SHAPE – Click in the editor to create a free shape vertex by vertex. To close the shape, click on the first created vertex or right-click on the mouse.
- SELECT – In this mode you can select a shape.
- EDIT – This enables the edit mode for a shape to adjust individual vertices.
- DELETE – Will delete a selected shape.
- CLONE – Will duplicate a shape.
- ROTATE – Enables the rotation mode. Use the mouse-wheel or drag the shape to rotate. You can adjust the minimal rotation steps / angle in the general preferences.
- SCALE – Enables the scale mode. Use the mouse-wheel or drag the shape to scale.
- MIRROR X – Mirrors a shape on the X-Axis.
- MIRROR Y – Mirrors a shape on the Y-Axis.
- SMOOTH – Creates smooth in-between vertices on a shape. Be careful with this, as the number of vertices might increase significantly, resulting in longer render times.
- CLEAR – Removes all shapes.
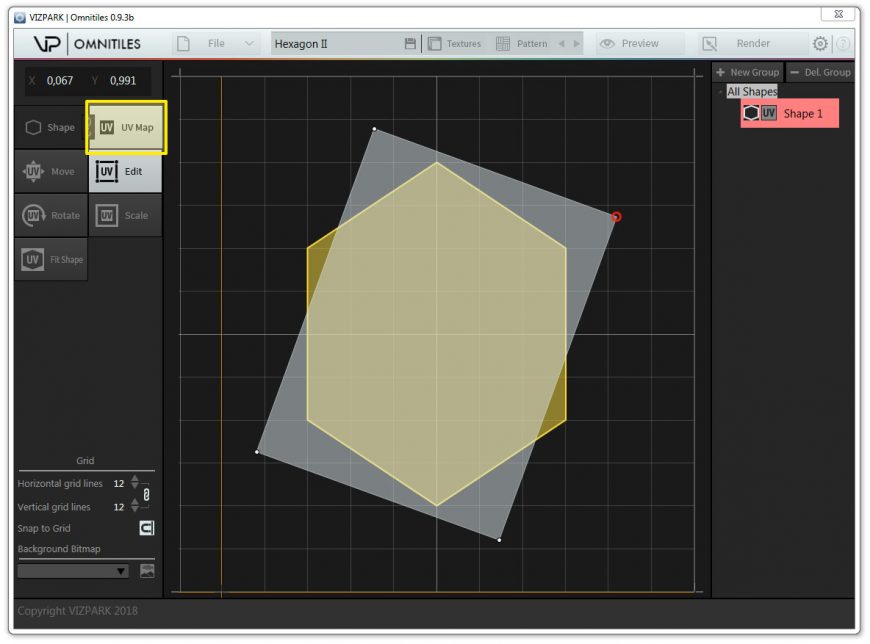
UV Map Edit Mode
When you create new shapes in the editor, each shape has an underlying UV map, which is connected to this shape. Usually the UV map is square and straight under a shape, but you can decide to adjust it´s size, rotation and even it´s vertices. This allows more freedom in the creation of patterns and much more flexibility than usual methods.
To edit a UV map of a shape, select a shape, then click on the UV Map, which will enable the UV edit mode. This mode will only edit the UV map, but keep the shape original.
To get back to the connected mode, click on the small connect icon between the Shape and UV Map buttons.
PREVIEW
Preview edits in realtime
The separate scalable preview window shows all edits in realtime. This gives you instant feedback when creating shapes, patterns, adjusting parameters or loading bitmaps. You can choose the layer / channel to display, access the randomization parameters and open the render settings dialog.
Preview Window
To open the preview window, just click on the PREVIEW button in the header of the main Omnitiles user interface. You can adjust the overall size by dragging the corner of the window. To adjust the aspect ratio to be perfectly square (1:1), click on the upper left icon in the preview window.
Layer/Channel
The dropdown menu gives you access to all pre-defined channels. Select one channel to be shown in the preview.
Randomization
Click on the second upper left cube icon to open the randomization dialog. This will give you access to several randomization parameters for further variation. (see below)
Render Settings
This button opens the same render settings dialog which you can also open from the main user interface.
RENDER SETTINGS AND RENDER OUTPUT
The render settings dialog provides access to the main tiling parameters, background color, edge map, output resolution and settings.
Tiling
The tiling parameters for rows and columns are used to increase the size of a pattern in general. Usually these parameters should be adjusted together to keep the aspect ratio of a pattern. In some cases it may be required to use a different value for the rows than for the columns, for example if the aspect ratio of the shapes in a patterns should be different than how they are in the pattern editor itself.
TILING EXAMPLE
Let´s say you want like to create a wall pattern with bricks that have an aspect ratio of 3:1 (which is approximately the ratio of standard bricks in most European countries / 21 cm x 7 cm). Using a pattern with 3 shapes in it where their aspect ratio is 3:1 is easy. But what if you have a pattern with shapes that have an aspect ratio of 4:1 ? Then you need to calculate the correct number of rows and columns to fit your desired 3:1 ratio for the bricks: You simply need to squeeze 4 into 3 which means your #rows should always be 75% of the #columns -> 8 rows x 12 columns or 12 rows x 16 columns or 24 rows x 32 columns and so on.
LAYER/CHANNEL
Here you can select which layer should be shown in the preview window and which layer should be rendered. If you select ALL, all layers will be rendered, if you select one layer, only this layer will be rendered.
BACKGROUND COLOR
The background color is the main color that will be visible wherever no shape is visible. You might use this for gaps or to add other layers in Photoshop later.
EDGE MASK
The edge map or mask can be used for different purposes. It can serve as a displacement or bump map, as an alpha mask for mortar or to adjust gaps between the shape edges.
- Generate Edge Mask – Can be turned on / off
- Adjust to tiling – Enabled will decrease the edge size if the tiling increases. Disable will keep the edge size, no matter which tiling is used.
- Size (in pixels) – Defines the overall size within the shapes.
- Edge gradient – Defines a color gradient for the edge map.
RENDER SETTINGS
These settings define the rendered output.
- Map Resolution – From 1k to 16k
- Anti-aliasing – From none to 16 samples
- Output – To individual bitmap files, saved to the location below or to PHOTOSHOP, which creates images directly within Photoshop, without saving to harddisk.
- The small cube icon on the upper right side opens the Randomization dialog.
- Output filename – Defines the output location, output file type and filename.
- RENDER NOW – Will trigger the rendering, showing a progress bar until rendering is finished.
Base Pattern

The Base Pattern has four perfect square shapes.
Tiling 6 x 6 (Ratio 1:1)
")
Ratio 1:1 with #rows and #colums using the same value (6) will keep the aspect ratio of the resulting pattern at perfect squares, no matter how many rows and columns you set.
Tiling 6 x 12 (Ratio 1:2)
")
Ratio 1:2 where #rows (6) is half the number of #colums (12) will result in tiles being half width as height.
Tiling 18 x 6 (Ratio 3:1)
")
Ratio 1:3 where #rows (18) is three times the number of #colums (6) will result in tiles being triple the width of the height.
RANDOMIZATION PARAMETERS
The randomization dialog provides more options to create variation within a texture pattern. These parameters create randomly colored bitmaps, mirrored tiles, random rotation, shape movement and rotation as well as the global random seed parameter.
RANDOM SEED (GLOBAL)
This value is the global random seed number that can be easily randomized by the cube button next to the number or by changing the number itself.
COLOR VARIATION
HUE, SATURATION AND VALUE change the tiles randomly within the entire pattern with values from 0 – 100 in both directions.
RANDOM FLIP VERTICAL / HORIZONTALLY
With these options you can mirror the bitmaps randomly by the X-Axis and Y-Axis individually.
RANDOM UV ROTATION
These angle parameters (degree) rotate the bitmaps within each shape randomly by an angle between the (from) and (to) values.
RANDOM UV SCALING
These parameters (percent) scale the bitmaps within each shape randomly by an amount between the (from) and (to) values.
RANDOM SHAPE ROTATION
These angle parameters (degree) rotate the shapes themselves within the pattern randomly by an angle between the (from) and (to) values.
RANDOM SHAPE MOVE
These parameters (percent) move the shapes within the entire pattern randomly by an amount between the (from) and (to) values.
Technical Requirements
- Windows 7, Windows 8 or Windows 10 (with most recent Service Pack, 32/64-bit)
- Intel Core 2 Duo or AMD Athlon 64 X2
- 8GB RAM minimum / 16GB or more recommended
- Online Internet connection for license activation
Installation and Activation
Installation is easy, just start the installer “Omnitiles Standalone installer.exe” and select the install location where you want to install. The installer automatically installs the application files, demo presets, library, and licensing system.
When starting Omnitiles for the first time, you need to activate your licenses in order to be able to use Omnitiles. The activation requires an internet connection and a valid user account on the VIZPARK website, where the license is connected to.
More information on Licensing and ActivationONE BITMAP WOOD PARQUET
In this 11:30 min. Omnitiles tutorial you´ll learn how to create a wood parquet floor based on a single wood bitmap. You´ll see how to randomize the bitmap and further parameters to get variations in the wood panels. You´ll also learn how to add a new roughness layer and how to easily change patterns.
HOW TO CREATE KITCHEN TILES
In this 10:30 min. Omnitiles tutorial you´ll learn how to create a kitchen tiles material based on a simple diamond pattern and some colored bitmaps. You´ll see how to adjust randomization settings and how to render maps to Photoshop for further editing.
CREATING MOSAIC PATTERNS
Learn how to create Mosaic patterns and images with Omnitiles Standalone using a source bitmap with and without multitextures. (4:30 min.)
OMNITILES TO SKETCHUP WORKFLOW (12 min.)
This 12 min. video shows the workflows from Omnitiles Standalone to Sketchup, how to create wall textures, change these and apply them to geometry using standard materials and vray materials.
HOW TO SETUP PHOTOSHOP BRIDGE (2 min.)
This 2 min. video shows how to setup the Photoshop bridge to render textures directly from Omnitiles to Photoshop.
INTRODUCTION AND OVERVIEW (7:30 min.)
This 8 minute video gives a brief overview of Omnitiles Standalone with it´s pattern editor, texture baking and included presets.
REFERENCE GUIDE
The OMNITILES STANDALONE online reference guide includes a detailed description of Omnitiles Standalone, it´s installation, usage and configuration.
If you are stuck, you can also use the DIRECT SUPPORT form and send us your request.
Omnitiles Standalone - Online Reference Guide