
MATERIAL MANAGER – Reference Guide
What is MATERIAL MANAGER ?
The VP MATERIAL MANAGER is a new innovative tool to manage materials and bitmaps within 3DS MAX® in ways never possible before. Material presets can now have ATTRIBUTES that can easily be filtered with the integrated attribute filters. The times are over where you needed to dive through folders to find the material you need. Just select the combination of attributes and the preset manager will show you the materials that fit these attributes. Finding materials was really never faster!
Lite Edition vs. Full Edition
What is the difference between the Lite Edition and Full Edition ?
The Lite Edition is a FREE add-on for all VIZ Plugins and includes material presets specifically made for our plugins. The Lite Edition is though LIMITED to only load, save and manage presets from our own material and map plugins.
MATERIAL MANAGER Lite Edition is available with the purchase of Walls & Tiles, Crossmap and Mosaic.
The PRO Edition is the full featured unlimited version that can handle ANY material and map preset from 3DS MAX®. Material Manager PRO is available as Material Manager Pro.
Material Manager v1.3.3
The documentation is the same for the PRO version and the LITE EDITION.
Features available only in the PRO version are marked with [PRO].
- First Steps – Installation
- Installation for single/all users and teams
- Loading and Saving Presets
- Using Filters, search and plugin types
- Creating Custom Previews
- Import and Export
- Changing Appearance
- Preferences Configuration
- Keeping up to date
- License Activation
- Maxscript API
FIRST STEPS - INSTALLATION
To install the Lite Edition, please use one of the plugin installers (Walls & Tiles, Omnitiles, Mosaic or Crossmap).
For the PRO Version, please use the installer that is provided as download for the FREE BETA.
Material Manager can be opened / used from two different locations: From the plugin(s) directly or by installing a MACRO button that can be integrated in the 3DS MAX user interface.
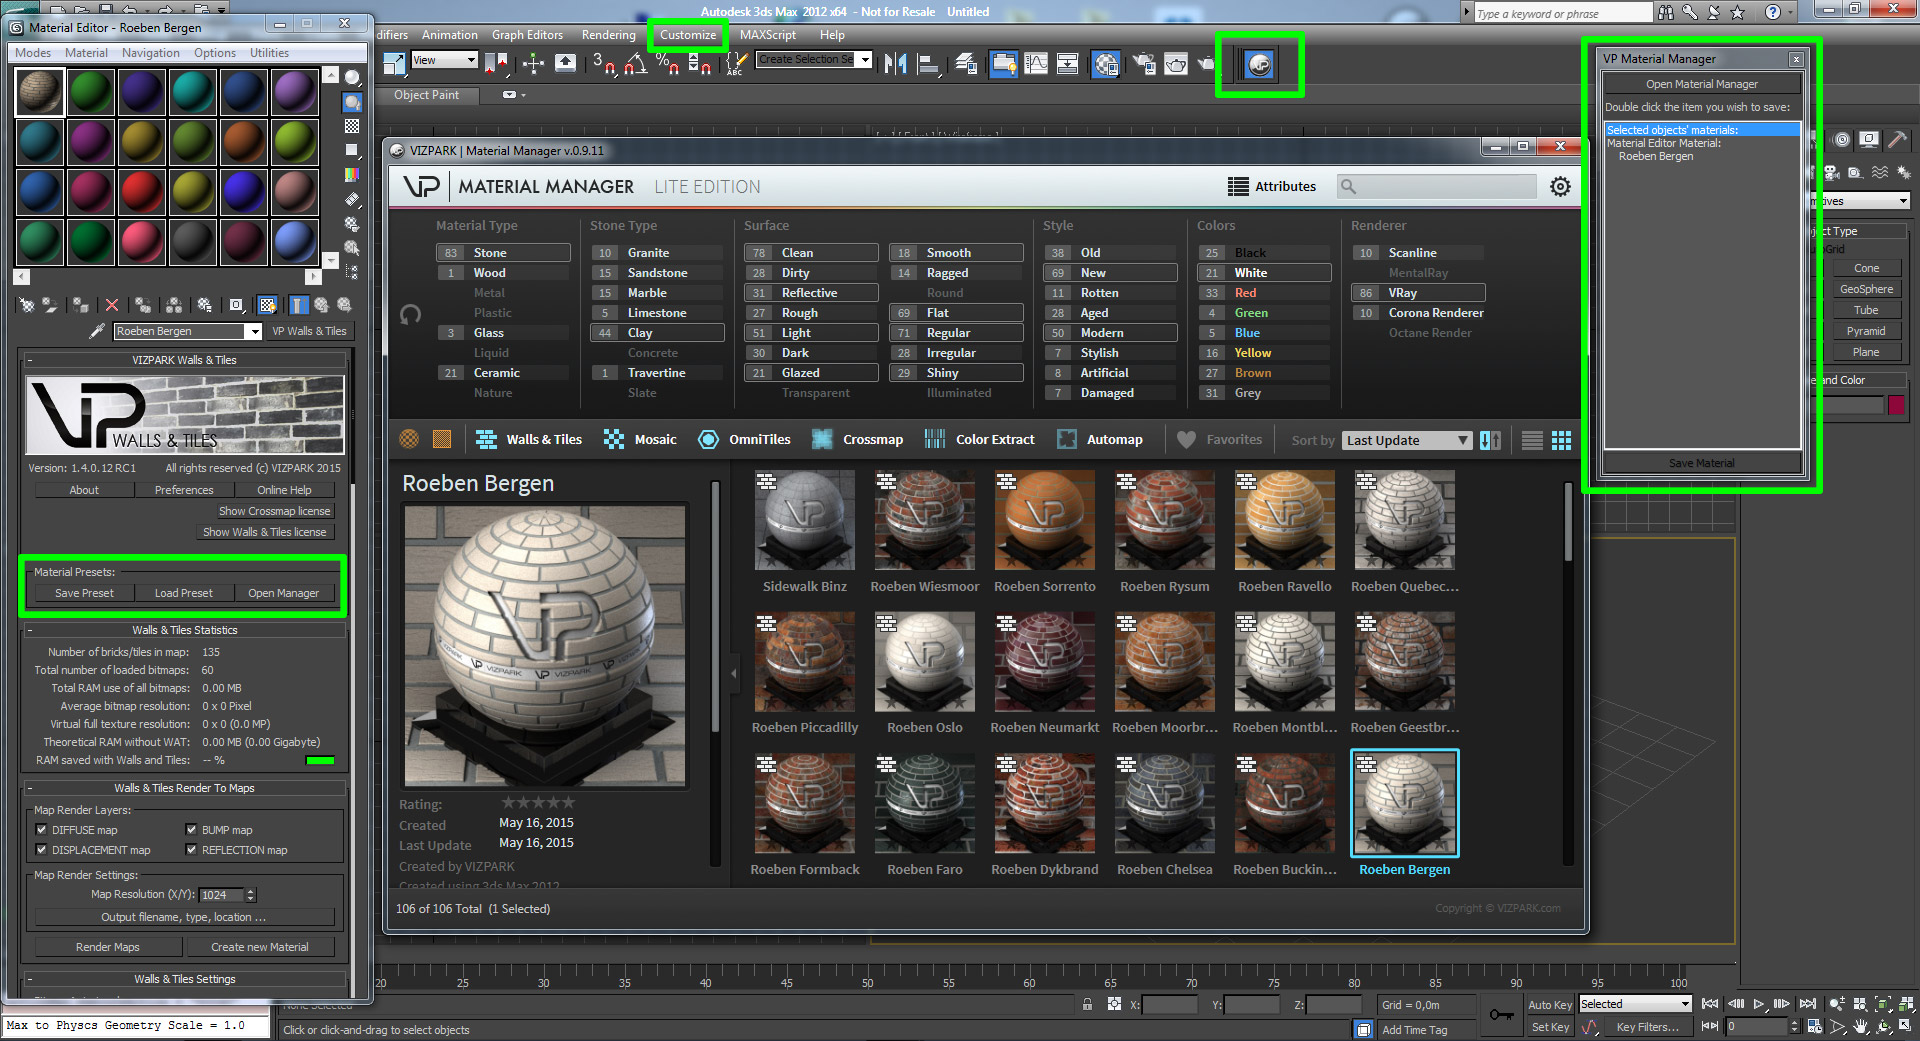
Accessing Material Manager from a MACRO button
Using the MACRO button, you can open Material Manager without going through the material editor and creating a new material. Just click the VP button and a small dialog will appear. The dialog has a button “OPEN MATERIAL MANAGER” on top and a list of materials or maps below. The list changes when materials are compatible and can be saved into the Material Manager database.
Accessing Material Manager from a Plugin
Material Manager can also be access directly from Walls & Tiles, Crossmap or Mosaic. The buttons SAVE PRESET, LOAD PRESET and OPEN MANAGER are visible in the header of each plugin.

Creating a MACRO button
You can create a MACRO button for the Material Manager, so you can open the manager, save and load presets without going through the material editor. To install the button you need to customize the user interface.
1. Choose Customize from the top 3DS MAX menu
2. Select Customize User Interface… (the first item)
3. Select the TAB Toolbars
4. Create a new Toolbar on the right side by clicking NEW… button
5. Name the toolbar “VP” or “VIZPARK” (a small toolbar window will appear)
6. Select VP Material Manager from the Category: drop down menu
7. Drag the item VP Material Manager from the list to your new toolbar
8. Place the toolbar anywhere you want in your 3DS MAX interface

USING the MACRO dialog
Once you created the VP macro button for Material Manager, you can open Material Manager and save materials or maps from here.
Open Material Manager
This button opens the Material Manager in GENERAL mode. This means that ALL presets are shown in the Material Manager (compared to only the preset of a specific plugin when using the LOAD button within the plugin).
Save materials / maps
The list shows compatible and available materials from your material editor or the scene.
NOTE: Only materials that are compatible with Material Manager will appear here, which is a limitation of the Lite Edition.
Double click on a material in the list or select a material and use the Save Material button below to save a material / map with it´s bitmaps into the database.
INSTALLATION MODES (SINGLE USER, ALL USERS, TEAMS)
Material Manager can be installed for single users or all user on a single workstation or for teams in a studio network environment, sharing the same library and database. This section explains the differences and how each installation mode works.
There are 2 settings that can be set during (the first) installation, which control the way Material Manager is installed. Note that these setting do not directly affect each other:
1. Current User vs. All Users
This setting determines where Material Manager registry settings will be stored as well as the location of log files (like errors.log, and currently the license logs) and the default location for the database. This basically determines who can use Material Manager on the workstation: all the users, or just the user who installed Material Manager.

When installed for all users (“Install for anyone using this computer”), Material Manager data will be stored as follows:
– Registry settings will be stored in HKEY_LOCAL_MACHINESOFTWAREVIZPARKVP Material Manager
– Default DATABASE location and errors.log will be in %ProgramData%VIZPARKPresetManager
When installed for current user only (“Install just for me”)current user only, Material Manager data will be stored as follows:
– Registry settings will be stored in HKEY_CURRENT_USERSOFTWAREVIZPARKVP Material Manager
– Default DATABASE location and errors.log will be in %AppData%VIZPARKPresetManager
2. Standalone vs. Teamwork mode

This setting basically determines the location of the database.
In stand-alone mode (above), the database will be located in the default location. The default location is based on the setting of Current User or All Users as described above.
In team-work mode, the database will be located in the folder the user specified. Normally, this folder will be on a network share, so that all users can access it. Important note: all the users that will be sharing this database must have read and write access to that folder.
Additional Locations:
There’s one more important location Material Manager uses, and that’s the library location. This setting is stored in the database itself, and normally should only be set when first installing Material Manager, or using the preference setting for it inside Material Manager.
Teamwork installation

Normal installation of Material Manager for use in Teamwork mode is very simple.
You simply install Material Manager Pro on the first client. You can choose either to install for all users or just for current user. When prompted, select Teamwork mode, then for DB location you choose a shared network folder (important: all users that will share the database need to have read and write access to that folder), and for the library files you also pick a shared network folder.
The database and library folders can be same folder, but it is a better practice to separate them.
It is very important NOT to use the application folder (where the installer will copy the Material Manager application files – normally C:Program FilesVIZPARKVP Material Manager) or any sub-folder of that folder, for both the database and the library files. The reason for this is that when uninstalling Material Manager, the application folder is being removed, and if the database or library files will be in it (or in any subfolder of it) they will be deleted as well.
Once the installation of the first workstation is done, the next workstations can be installed as well.
For those, you also run Material Manager Pro installation, choose Teamwork mode and for the database folder you choose the same networked folder as you chose in the first installation. The installer should then find the DB in that folder, and there will be no need to define the library location (since it is stored in the DB).
That’s it. You should be able to share Material Manager presets between the team members now.
LOADING AND SAVING PRESETS
Loading and saving presets is easy. You can either load presets (entire materials or maps) including their textures from the plugin itself or from Material Manager.
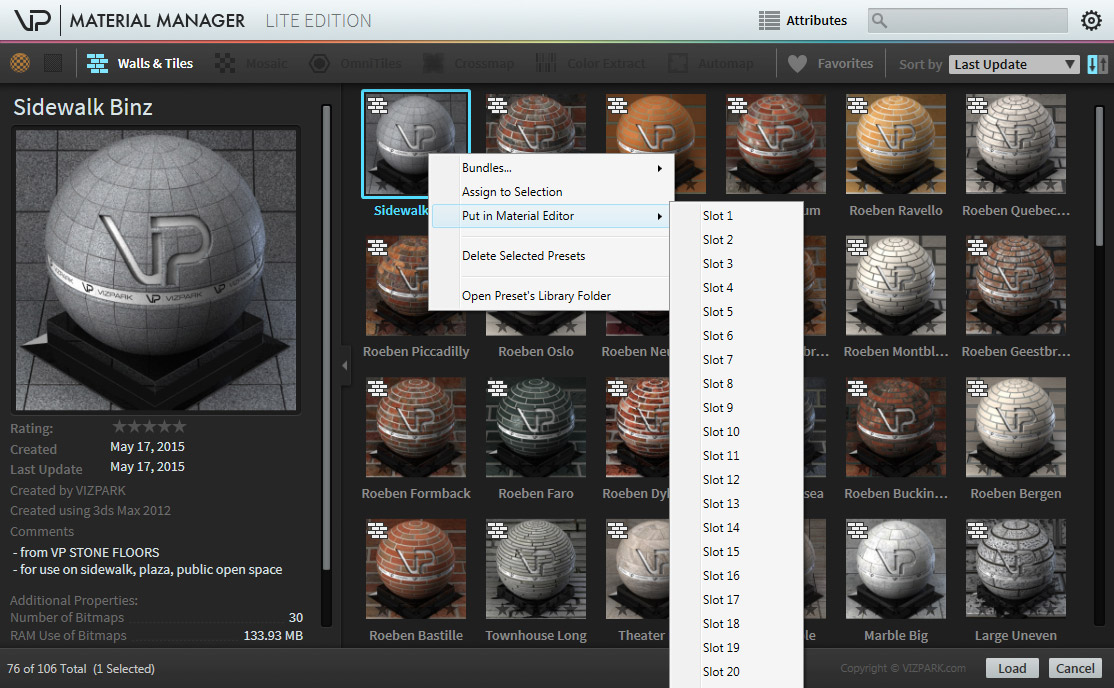

Loading/Saving a preset from Material Manager
You can also load and assign presets from Material Manager directly, either to selected geometry in your scene or to one of the material editor slots. To assign and load a preset, RIGHT-CLICK on a preset and choose Assign to Selection or Put in Material Editor > Slot xx
Loading/Saving presets from a plugin
If you want to load or save a material or a map from an existing Walls & Tiles material, Mosaic material or Crossmap map, you can use the LOAD PRESET and SAVE PRESET button. Using these buttons from a plugin directly will open Material Manager in PLUGIN MODE, which means that only compatible maps or material will be shown and no other presets can be selected or seen. Double-Click on a preset or select and choose LOAD on the bottom right corner to load the preset.
Saving a preset will automatically create a custom thumbnail that will be rendered depending on the settings in the preferences.
WATCH VIDEO - LOADING AND SAVING PRESETS (3 min.)
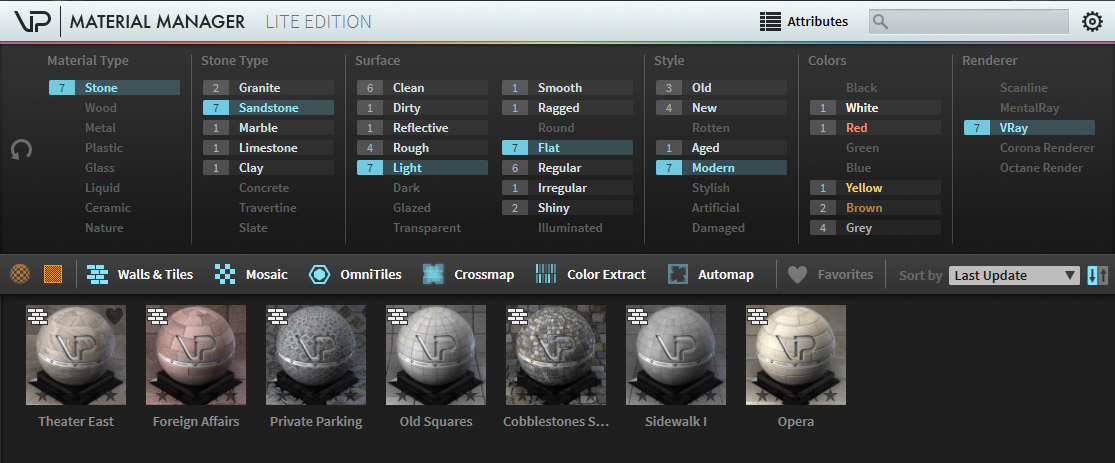
USING FILTERS, SEARCH AND PLUGIN TYPES
When working with many materials, finding materials becomes more difficult. That´s why we included an attribute browser which filters presets by predefined attributes. All of the attributes in the VIZPARK libraries are predefined, so that you can quickly search for specific materials using the filter. With the [PRO] version you can create and edit your own USER ATTRIBUTES.
Using Wildcard Search
The top header has a search field that can be used to search presets by name, comment, or attributes. Typing immediately updates the preset list. Try typing “castle” or “street” 😉
If you want to search material presets by project, client or artist, you can also use the comment field to add these infos and then search in the search field by typing the string. Only presets which contain the string in their name or comment will be shown as search results.
Filter by PLUGIN Types
Below the attributes you can find the icons for plugin types. The orange icon buttons are GENERAL Types for MATERIAL or MAP. You can turn off/on these type to only show materials or maps or both. The other turquoise icons are PLUGIN Type filters which represent our VIZPARK plugins. The PLUGIN and GENERAL type attributes cannot be set manually, they are defined automatically when saving a preset.
Hint: Use the Right Mouse Button to SOLO a plugin type. Right-Click on a PLUGIN Type will disable all other types than the clicked one.
Assigning or removing Attributes
You can add or remove attributes on one or more filters easily. Just hover over the attribute filter button and you´ll see a + or – appearing on the button which adds or removes the attribute.
Searching by Attributes
The attributes are predefined filters that only show those presets which have these attributes. Filtering by attributes will narrow down the result so that you can quickly find the ones that fit to your needs.
On the left side you´ll find a red reset button that resets all attributes.
User Attributes [PRO]
The USER ATTRIBUTES can be edited and changed like needed. Just hover over one of the User attributes on the right side of the Attributes browser and a small PEN and DELETE symbol will appear above them after a second. Using the pen will modify the attribute name and the delete icon will remove the attribute and set it to default.
WATCH VIDEO - EFFICIENT PROJECT MANAGEMENT (6:30 min.)
CREATING CUSTOM PREVIEWS
With Material Manager you can add multiple previews per preset and create your own custom thumbnail scenes that will be used to render thumbnails when saving a preset.

Adding multiple previews
By default, Material Manager renders a thumbnail for each preset that is saved. While this should give a good representation for a material, it may be helpful to add more preview images. When using the Inspector window on the left side of the gallery or list view, you can add up to 5 preview images pre preset. Just click on the small square with the “+” in it and a dialog opens to select an image. The image will be stored in the database. You can delete previews by clicking on the small “x” on the top right corner of an additional thumbnail preview.

Viewing multiple previews
In gallery and list view only the first thumbnail preview will be shown. To view more previews, you can either select the small square thumbnails or enlarge the preview and then click through with the arrow buttons on the left and right sides or with the keyboard arrows left and right. When reaching the last preview of a preset, the next one will be the following preset of the results in the gallery or list view. This is intended to quickly go through larger previews of multiple presets.

Changing Preview render settings
When saving presets, you can choose to save a preset WITHOUT rendering a thumbnail or WITH rendering a thumbnail automatically. When rendering a thumbnail, each renderer uses it´s own version of a specific thumbnail scene that is located in the installation folder inside of the folder ../VIZPARK/VP Material Manager/rendererSettings/.. . This folder contains the default thumbnail scene files which will be used if you don´t define your own thumbnail scene folder with custom thumbnail scenes. Creating your own thumbnail scenes requires some knowledge about how to name the objects that should be using the material and the camera that should be used to render the scene. Please view the video below to learn how to create and modify these scenes.
Thumbnail Render Size
The thumbnail render size can be changed for x and y independently. While the enlarged preview will show the full thumbnail in it´s correct width and height, the small preview thumbnail will be cropped to match the square preview in the inspector window and the gallery view.
Thumbnail Scenes Path
If you want to use your own modified thumbnail scenes or the additional scenes to render cloth or fluid materials, you can choose a different folder path which includes the scenes. If you render a material with a renderer that does not have a matching thumbnail scene in the selected custom scenes folder, the default scene will be used. So please make sure that your scene has the correct naming (“thumbnail_VRAY.max” or “thumbnail_CORONA.max” and so on).
Render Quality
Currently we have included default render settings for Fast, Good and High quality. Fast will be render a quick preview at the cost of image quality. High will render a thumbnail with high render settings at the cost of longer render times and Good is a setting in the middle between Fast and High. Currently these render settings cannot be modified, but you can render your own images without using the automatic render thumbnail feature and replace them later.
Replacing Thumbnails
If you want to replace a main thumbnail with your own rendering, just use the right-click menu above one preset and choose “Thumbnail > Replace Thumbnail“. A dialog will let you choose a custom image that will replace the current thumbnail.
Re-Rendering Thumbnails
You can re-render thumbnails automatically, for example if you imported presets without using the automatic render thumbnail feature or if you have rendered fast previews and want to replace those with high quality thumbnails. Using the right-click menu “Thumbnail > Render Thumbnail” on one or more presets will start the render thumbnail(s) and feature and render thumbnails based on the settings in the preferences and the available custom thumbnail scenes.
WATCH VIDEO - CREATING CUSTOM PREVIEWS (12 min.)
IMPORT AND EXPORT
Material Manager Pro offers two different methods to import presets and one method to export presets, aside of the direct integration into our VIZPARK plugins.
Method 1 (single export/import): You might want to exchange materials including bitmaps with your colleagues or just transport materials from one computer to another without wanting to re-assign bitmaps ? Then the single export/import feature of Material Manager is the easiest way. We have implemented a proprietary format called .mmp which stores all files (.mat file, database with attributes, bitmaps and preview images) in one convenient file for easier exchange.
Method 2 (.mat library import): If you want to bring your own .mat libraries into Material Manager for further use and to benefit from the additional features like multiple previews, favorites, rating, sorting, commenting and more, you can use the convenient “Import 3Ds Max Material Library” feature.

Method 1: Export and import single presets (.mmp)
To export single presets (or multiple selected presets, each one in one separate file), you can use the “Export Selected Presets” feature, available through the right-click menu on one or more selected presets. Using this feature will create a .mmp preset for each preset, containing the .mat file, an xml file with additional information about the preset´s attributes, included bitmaps and one or more of the thumbnail preview bitmaps.
To import single presets, navigate to the preferences “Library” tab and use the button “Import Material Manager presets…”. After successful import you might have to refresh your database by selecting any attribute or re-opening Material Manager, to see all imported presets.

Import 3Ds Max material libraries (.mat)
If you want to import your existing 3Ds Max material libraries, you can use the “Import 3Ds Max Material Library” button in the preferences “Library” tab. Pressing this button will open up a dialog to select a compatible .mat library.
The selected .mat file will be analyzed by Material Manager for all materials inside and for any missing bitmaps. All materials that have missing bitmaps will be marked RED and those presets will be deselected while all presets without any bitmaps or with all bitmaps found will be selected and marked BLACK. If you have too many presets marked red, you might want to check your bitmap paths before and maybe add bitmap paths to the 3Ds Max User paths preferences.
Thumbnails Generation
Choose Generate Thumbnails if you want Material Manager and 3Ds Max to render thumbnail previews based on the preferences settings for each material and choose Don´t generate Thumbnails if you want use the default thumbnails without renderings any thumbnails while importing the materials. You can still render thumbnails later, as described above.
Import will start the import (and rendering if selected) process. Be aware that rendering the thumbnails might take a long time, depending on which settings you choose in the preferences for thumbnail rendering.
CHANGING APPEARANCE
Have you ever wished to change the width of the material editor to display more materials ? Well, now you can change Material Manager´s appearance however you like. You can…
- Resize the window
- Switch between GALLERY and LIST view
- Show / Hide the Filter Attributes
- Show / Hide the Inspector (bigger preview with further information)
This way, you can change Material Manager in a way that fits your personal setup and workflow.

PREFERENCES - CONFIGURATION

DISPLAY
Hide unsupported materials
When this option is selected, materials which may not be compatible with your current version of 3DS MAX® or renderer will be hidden to avoid problems when trying to load a preset. For example, presets saved with a newer version of 3DS MAX® may not be compatible with older versions of 3DS MAX®, so the presets are hidden when Material Manager is used in an older 3DS MAX® version than the presets were saved with.
Show only materials compatible with the active renderer
Enabling this option will automatically select the renderer attribute filter of the active renderer when opening Material Manager. This way, only renderer compatible presets are shown to avoid loading of wrong or incompatible presets. You can still disable the renderer filter in the attributes to see presets of other renderers included in the library.
Always on top
Enabling this setting will keep the Material Window on top of all other windows, even when clicking on the 3ds Max UI. This can be quite useful when working with multiple monitors where Material Manager is open on one screen and 3ds Max on the other screen.
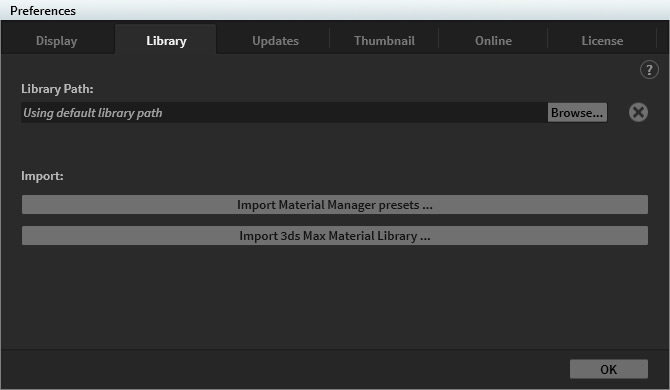
LIBRARY
Changing the Library location
In the preferences you can also re-define your library location. As Material Manager stores all data in a single database file and the bitmaps in folder inside of a selected library location, it´s required that both related to each other correctly. If you want to move the library to another place, it´s important that you copy or move the entire library folder to the new location, otherwise the presets cannot be loaded.
To change the location, select LIBRARY from the preferences and the browse for the new location of your library. If you want to render in a network environment, it´s important to select a location where the library and it´s bitmaps can be accessed by all render nodes! So choose wisely.
Import Material Manager presets …
Import single .mmp presets. Documentation please see above in secion “IMPORT AND EXPORT”.
Import 3ds Max Material library …
Import multiple presets stored in a 3ds Max material library (.mat). Documentation please see above in secion “IMPORT AND EXPORT”.

UPDATES
User Library updates
Here you can choose the frequency of when Material Manager checks for updates in the online USER LIBRARY.
CHECK NOW will do the update check immediately. New presets in the User Library are indicated on the top of the Material Manager window as a small green number (e.g. 5 new). Pressing the “USER LIBRARY” button on top of the header will update the database, showing all new or updated presets. It will not download the entire presets immediately, it just updates the database. You then have to select each preset that you would like to download.
Application updates
Here you can choose how often Material Manager checks for updates of the application itself. If an update is available, a notification message will appear, including the changes to the previous version and a download link for the update installer.

ONLINE
Username and Password
The Online tab is the connection to the User Library. Only if you are logged in here, you can access and download User Library presets. The username and password are the same as your VIZPARK user account.
To keep logged in to the User Library, just check the “Stay signed in” setting.
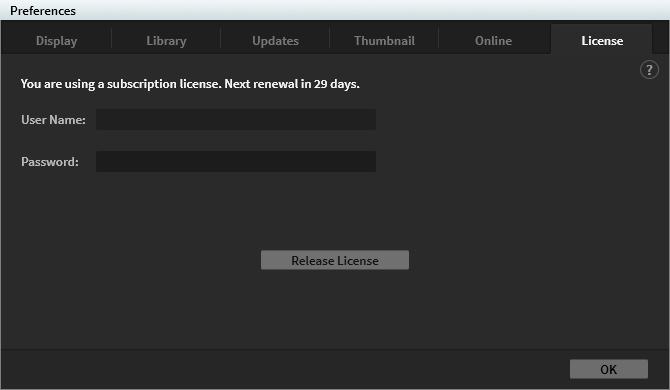
LICENSE
License and Activation [PRO]
The License tab shows your current license, the days until your demo or subscription expires and lets you activate or release a license.
To activate your license (subscription or perpetual) you need to login with the same username and password that you used to order Material Manager Pro in the VIZPARK shop. If you forgot your username or password, either try to reset the password or send us a support ticket for further help.
LICENSE MESSAGES
You are using a time limited license. It will expire in xx days.
When this message appears, you are using the demo license. Once it´s expired you need to obtain a subscription or perpetual license.
You are using a subscription license. Next renewal in 30 days.
When this message appears, you are using the subscription license which requires renewal every month.
You are using a perpetual license.
When this message appears, you are using the permanent license.
ACTIVATE / RELEASE LICENSE
This button activates a license if the license is available in the VIZPARK store and your account. You can release a license and activate the license again, even on a different computer. An online connection is required for this.
MAXSCRIPT API
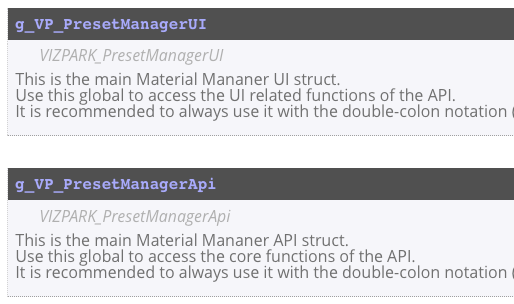
MAXSCRIPT API
Integrate Material Manager into your pipeline [PRO]
Those who are familiar with Maxscript can furthermore integrate Material Manager into their pipeline. Material Manager has a Maxscript connection to 3Ds Max, which can be used to automate tasks and integration in studios or teams, using the Maxscript language. The Maxscript API documentation is a reference to understand how to use and develop a connection or automation with Material Manager.
Need further help ? Please submit us a support ticket: