Tutorials
HDRI lighting with 3ds max and vray
In this tutorial you can learn how you to set up and light a 3ds max exterior scene with a HDRI Skydome and vray. While hdri lighting is not very complicated it´s necessary to know some details in order to get a good result.
The VP HDRI Skydomes have a very high dynamic range, which is best to create sharp sun shadows. Also they have an accurate white balance that will bring convincing and colorful lighting into your scene with a few clicks.
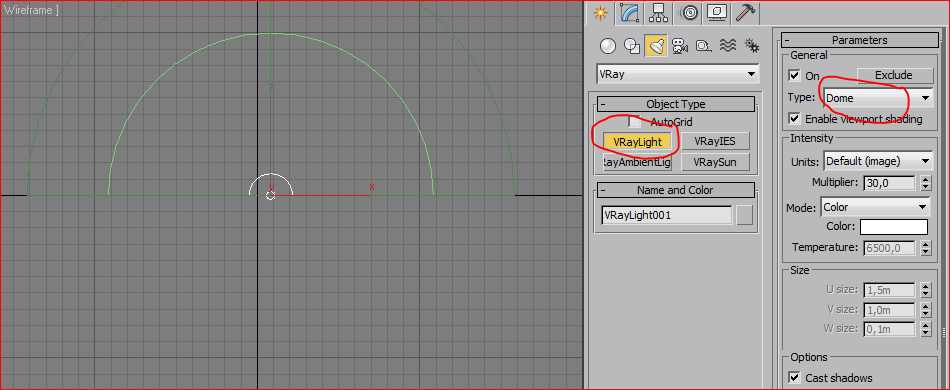
Basically you just need to follow 2 main steps: First to create a vray light dome and second to create a vray physical camera with proper exposure settings.
(1) Creating a vray light dome
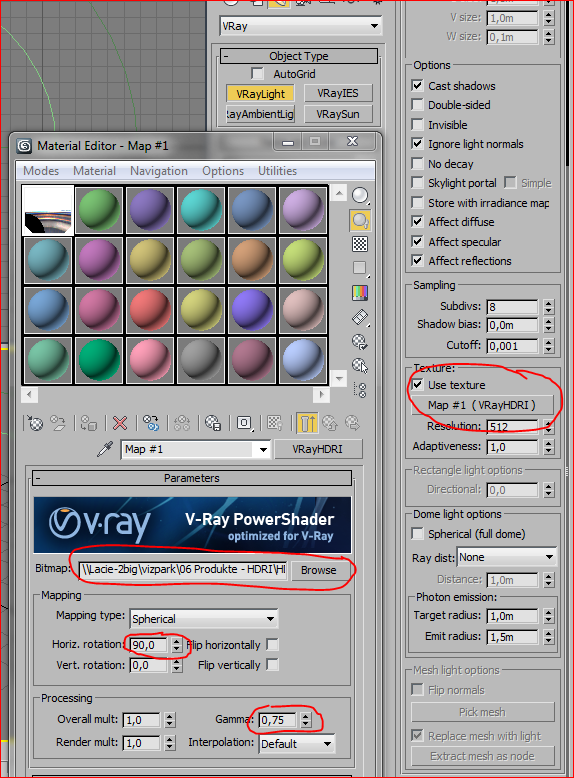
- Next add a VrayHDRI map into the Texture slot
- Drag the VrayHDRI map in your material editor
- Load the HDRI file you want to use
- Set the mapping type to spherical
- Set the gamma value to 0.75
Note: The Horiz. rotation parameter of the VRayHDRI map allows one to rotate the sky around to change the sun light direction. Every sky is having the sun placed in the middle which allows to quickly change and try different skies by keeping the light direction.
Until this point, we have created our light system, in the next point we will treat the camera settings. Before we move onto the next point, let’s speak about the gamma setting. This setting allows colors to have more punch and contrast, in an high dynamic range context it means that bright spots are much brighter than normal, therefore creating sharper and stronger shadows. You can decrease this value if you feel the light is a bit too flat to bring more contrasts, or increase it if the light gets too harsh.
(2) Creating a camera
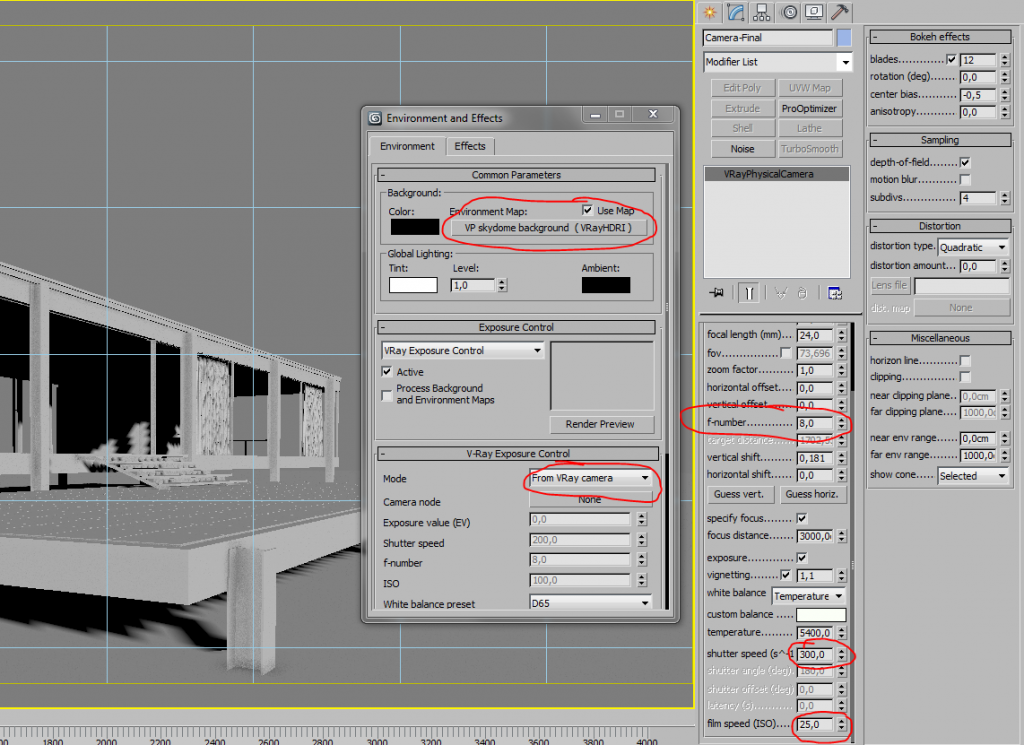
There are basically two things we want to achieve when setting up the camera: a proper exposure, and an adequate white balance.
To set the exposure up we have a few settings:
- Shutter speed
- Aperture value (f-number)
- Film speed (ISO)
These are photographic parameters and work the same way like a normal camera. There are lots of tutorials on the web explaining photography and we don´t want to go into too much detail here. As the settings may vary strongly depending on the used hdri map, it´s not very useful to define specific settings here.
If you want to use the same hdri skydome for the background, you can just add the same map to the environment slot of the render Environment Map. If you can´t match the background with the lighting of the vray domelight, you can also create a second copy of the vrayHDRI map with different settings and split these two.
Setting up the white balance :
Using the temperature option is probably the easiest as you can directly change a value and get a cooler or warmer result. For most of conditions, a value ranging from 4500 to 6500 should give you best results. You can always use the eyedropper of the Vray Frame Buffer to see whether a supposed white area is too blue or too red and adjust the temperature according. If it is too warm one must decrease the value, and oppositedly if it is too cold one must increase the value.
Also, sometimes having white areas looking blueish or reddish can lead to a better overall result and is dependant on the mood you try to achieve !
All of the VP HDRI Skydomes include 3ds max scenes with proper light and camera settings, so you can just go ahead and start rendering your own scene.


Pingback: More HDRI | Ciro Cardoso